Just a few days back, Google unveiled it’s 2018 flagships in the form of Pixel 3 and Pixel 3 XL. Pixel series is an upgrade to Google’s Nexus lineup, carrying the same development friendly nature, top of the line hardware and state of the art camera setup makes it one of the best quality professional camera holding phone.
Pixel phones are the most wanted devices among the developer community and other tech enthusiasts for running the pure stock Android UI, unlockable bootloader and rooting works. Pixel 3 and Pixel 3 XL lie under the same category, topjohnwu the developer of the popular systemless root ‘Magisk’ has recently updated it’s tool to v19.3 that includes root support for Pixel 3 and Pixel 3 XL. The process to root Pixel 3 and Pixel 3 XL is quite simple but first you need to unlock bootloader on Pixel 3/3XL. If you are interested to root your Pixel device then we have got you covered, in this tutorial we are going to show you the step by step process to unlock bootloader and root Pixel 3/Pixel 3 XL.
Root Pixel 3/Pixel 3 XL
The bootloader unlocking on Pixel 3 and Pixel 3 XL is nothing different then one on the last years Pixel devices. But if you are new to the rooting process then we recommend you to pay attention on each step to unlock bootloader and root Pixel 3/Pixel 3 XL.
Before you begin:
You phone’s battery should be charged up to 60%.
Create a secure backup of your important data including Messages, Call Logs, Apps, downloads and gallery stuff. (Because unlocking bootloader on your device will format your phone completely).
Enable ‘USB debugging’ and ‘OEM Unlock’ option from Settings > Developer options. Here is the guide for your reference.
Now you need to install the latest ADB and fastboot driver for windows PC. Follow the guide to install them right away
How to unlock bootloader on Google Pixel 3 and Pixel 3 XL
Process:

Step 1: Now open the directory where you have installed the adb and fastboot drivers, search for the folder named ‘ADB’ in there. Now open the folder and you’ll see four files including ADB and fastboot.exe(as shown).
Step 2: Connect your device to PC using USB data cable and let the drivers installed completely.

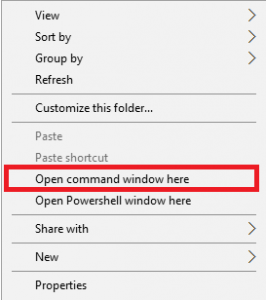
Step 3: Now press and hold Shift key and right mouse click any empty space in the same folder and choose ‘Open command window here'(as shown above).
Step 4: Now you need to boot your phone into fastboot/bootloader mode, to do this enter the following command in the command window.
adb reboot bootloader
Step 5: Once your phone boots into fastboot mode, issue a second command to ensure adb driver is picking up your device.
fastboot devices
Step 6: Once your phone boots into fastboot mode, issue the following command to unlock it’s bootloader.
fastboot flashing unlock
Now you will find bootloader unlock option on your device, confirm the process and you are done.
How to root Pixel 3 or the Pixel 3 XL
What we have seen so far is that, Magisk rooting always needs a TWRP recovery, since Pixel 3 is a newer entry in the market so TWRP recovery is not available at the moment. So we need to perform all the modification and patching the bootloader via fastboot, the same way TWRP recovery does for us.
Necessary downloads to root Pixel 3 XL
First you need to download stock OS for your device. See the build number from the firmware detail section on your device and download it accordingly. For you ease we have mentioned the download link for the latest firmware below.
- Download stock OS for Pixel 3 – Link 1 | Link 2 (Link 2 is for Verizon exclusive only)
- Download stock OS for Pixel 3 XL – Link 1 | Link 2 (Link 2 is for Verizon exclusive only)
Extract the downloaded firmware using any archive manager and look for an archive which has a name starting with image-crosshatch or image-blueline.
In the same archive you will find the boot.img file which is the stock bootloader image that we’ll need.
Download Magisk to root Pixel 3/3xl:
Here Install the APK on your device.
Now connect your device to PC and transfer the extracted boot.img file on the internal storage of your device.
Open Magisk Manager and open settings. Tap on Update channel and select Beta.
Then on the main Magisk screen, then choose Install > Install > Patch Boot Image File.
It’s the time to choose the stock boot image file that you have copied earlier.
Let the process complete and once it is completed the patched_boot.img file will be saved into the Downloads folder on the device.
Process to root Pixel 3/Pixel 3 XL
Once again connect your phone to PC and but this time move the patched_boot.img file from downloads folder to adb folder on PC.
Reboot your phone to bootloader mode, by typing “adb reboot bootloader” in the command window.
Once your phone boots into download mode, issue the final command to root your Pixel 3/3XL.
fastboot flash boot patched_boot.img
That’s it! You have successfully rooted Pixel 3 and Pixel 3 XL using Magisk. Now go to Google Play and download any root checker app for your satisfaction. Cheers!
