In this guide we come up with a quick tutorial to help those who want to enable OEM unlocking option on their Android phone. The OEM unlock option on most device is hidden by default, (mostly on Samsung) but follow this guide you will learn how easily you can enable OEM Unlock option on all Android Phones even it’s hidden.
OEM Unlocking option. Why is this for?
OEM Unlocking option is given on almost all the Android devices, the purpose of this feature is that when you turn it on it allows you to alter the firmware provided by device manufacturer by unlocking it’s bootloader. Once you unlock bootloader on your device then you can perform the other customization stuff which includes, installing TWRP recovery, rooting, flashing different custom ROMs and mods. So in short enabling the OEM unlocking is the first step you need to perform before unlocking bootloader on your device.
How to enable OEM Unlocking option
As we mentioned above, the OEM unlocking option on various smartphones mostly Samsung is hidden by default, the purpose of hiding is that Samsung added an extra layer of security with its software regarding the option which gives freedom to unlock the OEM. Because the company doesn’t wants you to modify the firmware comes with the device, this is just for security of the device. However enabling this option also super simple and no extra software or tool is needed. We have separated the guide into two parts in the first part we will show you how to enable OEM unlocking on all Android Phones, and in the second parts we will discuss the process to enable OEM unlock on all Samsung phone, if it is missing.
Part 1: How to find and enable OEM unlock option on Samsung devices
Open the “Settings” app from your app drawer.
Search for “Date and Time” using the search icon which can be found on the top right corner of your settings app and once found tap on it.
Open the Setting app from the app drawer.
Once in the settings menu, navigate down until you find the option “Date and Time”. Tap on it and turn off the automatic date and time setting and set the new date to a month back.
Now go back and in the Setting menu tap on Developer options. ( If Developer options are not seen in the menu, head to about phone sections > and tap on build number seven times until a toast animation shows a message ” You are now a developer”)
Now enter developer options and locate the “Auto Update System” option and toggle it off.
Once done with the above process, now you need to tap on the system Update option and set it to manual system update.
Go back and just reboot your device.
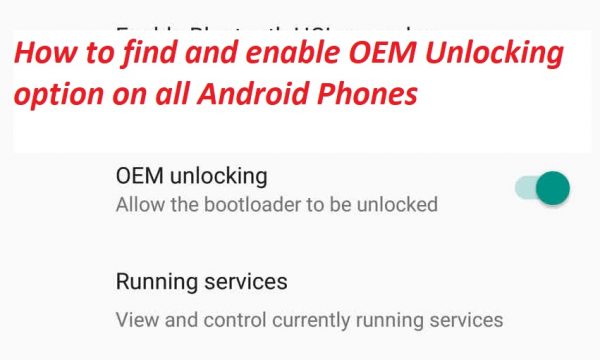
After the device boots completely, open the Settings app and tap on “Developer Option”, there you shall find the OEM Unlock option.
Part 2: How to enable OEM unlock option on all Android Phones
Now this super easy, just head to settings menu and tap on the developer options (If Developer options are not seen in the menu, head to about phone sections > and tap on build number seven times until a toast animation shows a message ” You are now a developer”).
Note: if you are running Android Oreo firmware then you’ll find the Developer option in the System settings.
In the Developer Settings as mentioned above you’ll find the OEM unlock option.

Tap on the toggle to enable it and it will show you a warning like (as shown)

Just tap on Enable to enable OEM unlock option on your device.

That’s it! We hope this guide helped you, if you yes then we’ll happy with just one share. Stay tuned for more updates.