If you want to root your HTC U12+ without TWRP recovery then you are at the right place, just read the instructions below to root HTC U12 Plus with Magisk.
HTC U12+ is the 2018 flagship released by the popular Taiwanese company HTC, it carries latest hardware with unique translucent back allows you to see the internals of the device. Being a 2018 flagship HTC U12+ comes with big hopes to made it’s place in the tough competition of the smartphone market. The HTC U12+ is equipped with premium specifications including Snapdragon 845 processor along Adreno 630GPU and 6GB of RAM on board with 64/128GB varaints. The internal storage can be expanded upto 512GB using microSD card slot.
In the optics and lenses department, the phone comes with a Dual 12MP + 16MP camera setup on the back and also dual selfie shooter lenses on the front. The company has worked a lot in the Edge Sense technology, that was first seen on the HTC U11. The Edge Sense technology on HTC U12+ comes with a bunch of new gestures to perform different actions on the device. The phone comes with pre-installed Android Oreo of the box but the company is planning to release Android 9.0 P as well.
You can further get more out it’s powerful hardware by getting access to the system core and it can only happen with proper root access enabled on the device. Rooting gives you access to explore beyond the stock software provided by the device manufacturer. In fact you can tweak you Android phone with different system optimizations by installing mods, UI tweaks, custom recovery installation and much more.
HTC U12+ Root
The HTC U12 Plus root process is very simple which doesn’t involve the lengthy TWRP recovery flashing process to gain root access via Magisk. In this guide we’ll you the best and the simplest method to Root HTC U12+ with Magisk and without TWRP recovery. Thanks to an XDA senior member Freak07 who has invented this method to root HTC U12 Plus with stock boot.img file.
First you’ll need to download the stock firmware ZIP for the HTC U12+ provided by the developer and then extract the boot.img file from it and patch the extracted boot.img file using Magisk. The process seems to be very tricky at first, but don’t worry just follow our steps in sequence to get root access safely on your HTC U12+ using Magisk.
How to root HTC U12+ with Magisk
You phone’s battery should be charged up to 60%.
Make a secure backup of your important data including Messages, Call Logs, Apps, downloads and gallery stuff.
Bootloader on your phone must be unlock, follow this guide to unlock it officially.
Now you need to install the latest ADB and fastboot driver for windows PC. Follow the guide to install them right away. Also download and install Latest Android USB drivers.
Download stock HTC U12+ firmware corresponding to the current firmware installed on the device: Link
Once you are done with the above preparations it’s the time to start the process to root HTC U12 Plus.
Steps to root HTC U12+ without TWRP recovery (Magisk)
Extract the boot.img file named as ‘boot_signed.img’ from the downloaded firmware.
Connect your phone to PC and move the boot_signed.img to the phone’s storage.
Now download the Magisk Manager APK and install it on your device.
Disconnect your phone from PC.
Open Magisk manager, Tap on ‘Insall’ and again select install and choose the ‘Patch Boot Image file’ option.
The boot file will be patched automatically once Magisk detects the file.
Once the patching completes, again connect your device to PC.

Now open the directory where you have installed the adb and fastboot drivers, search for the folder named ‘ADB’ in there. Once you find it open it and you’ll see four files including ADB and fastboot.exe(as shown).
Now copy the ‘patched_boot.img’ file from /sdcard/MagiskManager/ and paste it to the ADB folder you find above.

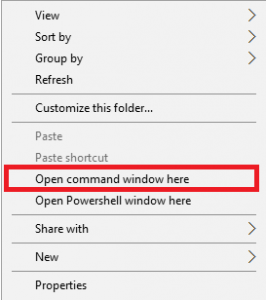
Now press and hold Shift key and right mouse click any empty space in the same folder and choose ‘Open command window here'(as shown above).
Boot your phone into download mode, to do this enter the following command in the command window.
adb reboot download
Now type the following command to check the currently active slot,
fastboot getvar current-slot
Finally flash the final command to flash the ‘patched_boot.img’ to the active slot.
fastboot flash boot_a patched_boot.img
fastboot flash boot_b patched_boot.img
Now type the following command to reboot your device.
fastboot reboot
That’s it! You are done with the process to root HTC U12+ via Magisk. Once the boot process is completed, the OS on your HTC U12+ will be rooted. Just go for the root specific apps on your device and start playing with the customization stuff.
Trouble Shooting:
If you issue any command in the command window, it shows “waiting for device” for too long, then you might be having an issue of adb drivers, follow this guide to solve it.
If this guide helped you don’t forget to share it with your friends.
Source XDA
