In this detailed tutorial we’ll show you how to root Exynos Galaxy S9 SM-G960F/FD/N/X and Exynos Galaxy S9 Plus SM-G965F/FD/N/X on Android Pie and install TWRP recovery on it.
Samsung has released stable Pie update for it’s flagship twins Galaxy S9 and S9 Plus a few weeks back, now if you want to root your Galaxy S9 and S9 Plus then the search engine has landed you at the right page. Exynos variants of Galaxy S9 and S9 Plus have got TWRP recovery support which means you can easily root Galaxy S9 and S9 Plus on Android Pie.
Samsung’s Galaxy series flagships are counted among top high end devices with amazing new features and top of the line hardware. Same is the case with the 2018 flagships S9 and S9 Plus, now Samsung is all set to unveil it’s 2019 flagships Galaxy S10 which will be the follow up devices for the last year’s S9/S9 Plus, the launch event will be held in February. Let’s see what’s new is coming with the 2019 flagships.
Coming back to topic, Since Android is an Open Source OS, which is an absolute beauty of this system. Rooting is one of the key factors that open gates to the core of the Android OS, rooting your device helps you in performing modifications in system files, flashing mods, installing overclocking kernels/Xposed framework, substratum theme engine and much more. Just read the instruction below to root Galaxy S9 and S9 Plus on Android Pie/Oreo and install TWRP recovery.
Guide to root Galaxy S9/S9 Plus on Android Pie/Oreo
This is a complete tutorial to root Exynos S9/S9 Plus on Android Oreo/Pie. Just keep reading the article to see the overview of the process.
Overview of the process to root S9 and S9 Plus:
Rooting the Galaxy S9/S9 Plus involves three method and each one is set up accordingly. As we mentioned above, TWRP recovery for Exynos Galaxy S9/S9 Plus is now available so first you need to flash TWRP recovery on Samsung Galaxy S9 and S9 Plus.
Once the TWRP recovery is flashed on Galaxy S9/S9 Plus this would enable you to install the flashable zip which includes, the zips for the important custom binaries.
Then you need to disable force encryption via data partition coupled with flashing the no-verity ZIP file as well. Finally, you need to flash the Magisk or SuperSU zip to get root access on Galaxy S9/S9 Plus.
The overall process is not as easy as any Pixel or Nexus device but it is fairly simple. All you need to do is just follow our mentioned steps carefully, to get root access on Android Pie running Galaxy S9 and S9 Plus.
Warning!
Rooting your device voids warranty so think twice before leaving for the process and don’t proceed ahead if you have no idea what you are about to do.
Compatible devices:
Exynos variant of Galaxy S9 and S9 Plus is supported at the moment. So don’t try to test this process on any other device especially Snapdragon variants. Please make sure to check the “Supported Variants and Models” section below before proceeding to the instructions.
Galaxy S9: codename: starlte
Supported models: Exynos variants SM-G960F/G960FD/G960N/G960X are supported.
Galaxy S9 Plus: codename: star2lte
Supported models: Exynos variants SM-G965F/G960FD/G960N/G960X are supported.
We warn you again don’t try to root any other model except the ones mentioned above.
How to root Galaxy S9/S9 Plus

There is no direct root method available yet so first we need to flash TWRP recovery to flash Magisk zip that allows us to obtain root access on our device.
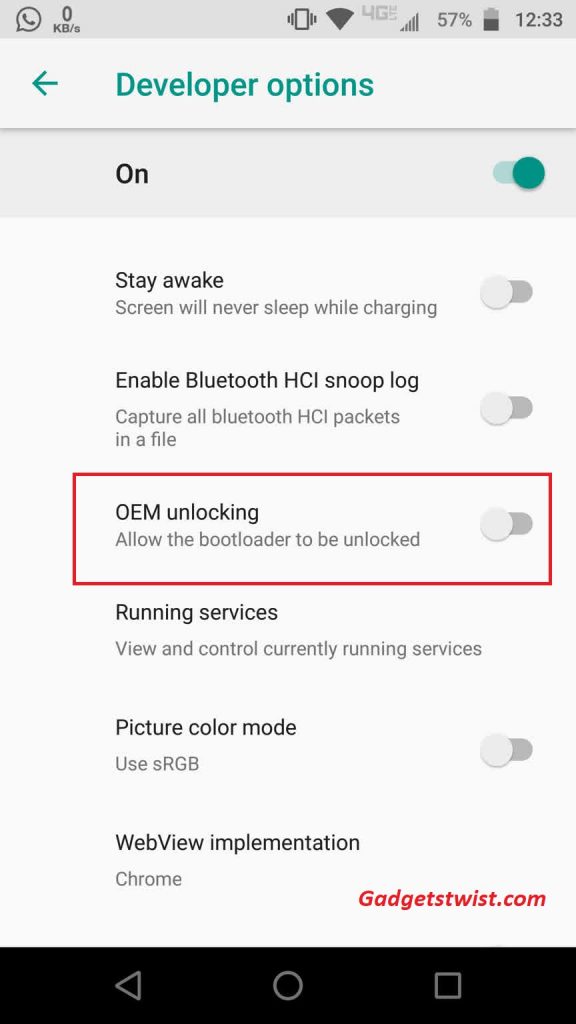
Enable OEM unlock option from Developer options
Head to settings menu and tap on the developer options (If Developer options are not seen in the menu, head to about phone sections > and tap on build number seven times until a toast animation shows a message “You are now a developer”.
Note: if you are running Android Oreo firmware then you’ll find the Developer option in the System settings.
In the Developer Settings as mentioned above you’ll find the OEM unlock option.

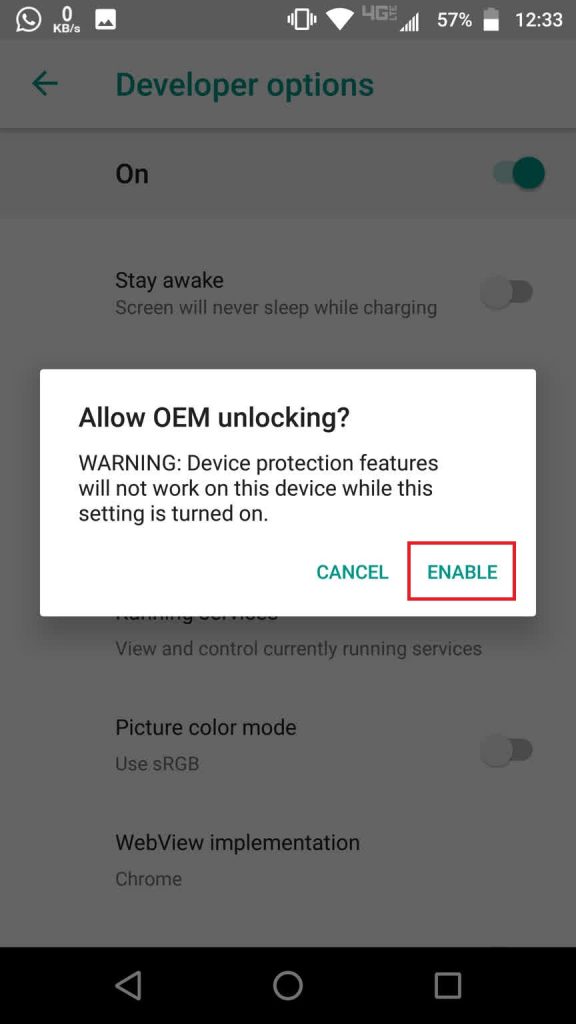
Tap on the toggle to enable it and it will show you a warning like (as shown)

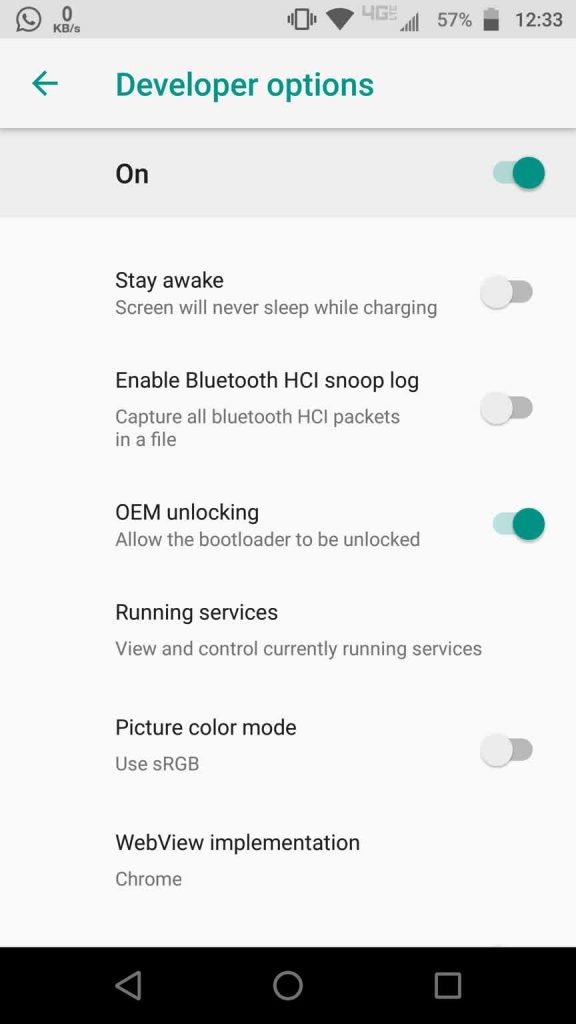
Just tap on Enable to enable OEM unlock option on your device.

If you are facing any issues in enabling OEM unlock option on Samsung device, follow this detail tutorial to solve it.
Necessary downloads:
Download official TWRP recovery for Galaxy S9. Latest version
Download official TWRP recovery for Galaxy S9 Plus. Latest version
Download No-verity Disabler ZIP: no-verity-opt-encrypt-samsung-1.0.zip
Download ElementalX kernel if running Android Pie on your device: ElementalX-S9-2.01.zip
Download ElementalX kernel if running Android Oreo on your device: ElementalX-S9-1.15.zip
Download Odin v3.13.1 zip and unpack it on any convenient location on your PC. Google Drive.
Download latest Magisk.zip.
The first step in order to root Samsung Galaxy S9 and Galaxy S9 Plus is to install TWRP recovery. The section below will take you through the complete process in detail.
Install TWRP recovery on Galaxy S9 and S9 Plus
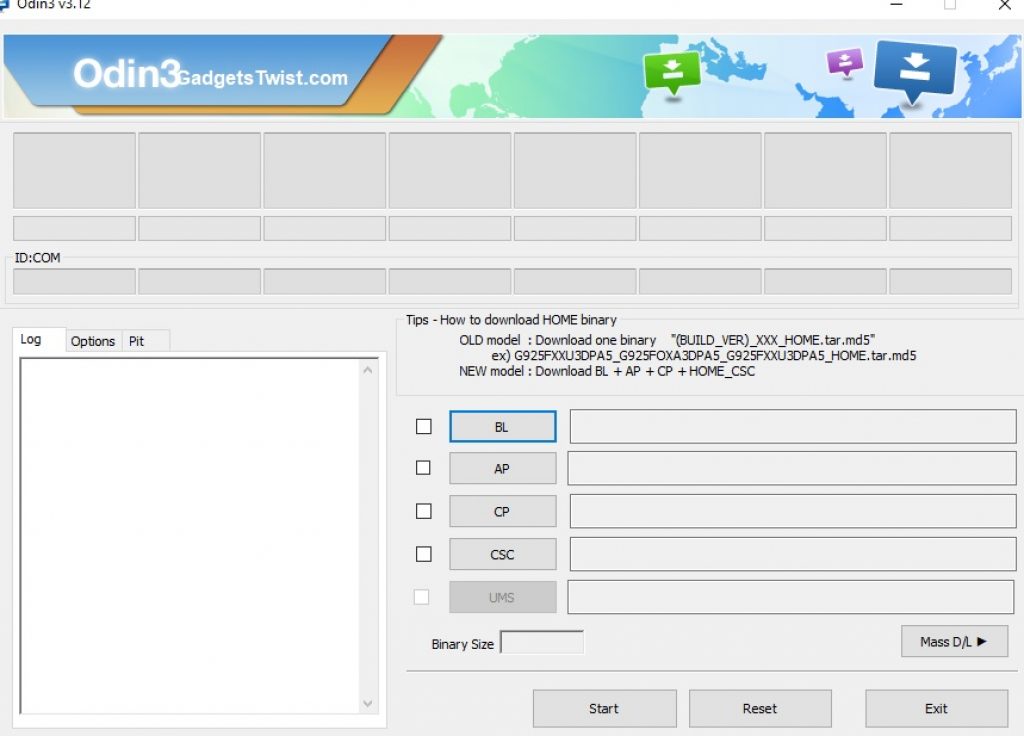
- Open the folder where you have unpacked the Odin.exe above and open it by double click.

- You will see the Odin screen like this (as shown above).
- Now for further action you need to boot your device into download mode.
Boot Galaxy S9/S9 Plus into Download Mode
- Turn Off your device completely.
- Now press and hold the Volume down, Bixby and Power buttons simultaneously until you see a warning sign on screen.
- Now press the Volume down Key to boot your device into Download Mode.
- Once in Download Mode, now you need to connect your device to PC via USB cable.

- In the Odin interface, You will notice the ID:COM box on the top left will turn blue (as shown).
- Now click the AP button in Odin and it will ask you the location of TWRP recovery .tar file that needs to be installed. Just give it the path to the file and Click Ok.
- It will load the TWRP recovery tar file and once it is done with it, simply press the Start button to start the flashing process.
- Wait for the process to complete.
That’s all about the process to install TWRP recovery on Galaxy S9 and S9 Plus via Odin. As you have successfully installed twrp recovery on your device, now process ahead for the rooting process.
Boot Galaxy S9/S9 Plus into recovery mode (TWRP recovery mode)
- Turn Off your device completely.
- Now press and hold the Volume Up, Bixby and Power buttons simultaneously until you see a warning sign on screen.
- Once the screen turns blue, it will boot your device into recovery mode.
- On the “Unmodified System Partition” keep it read only.
Format data partition in TWRP and Disable Encryption
- Now it’s the time to disable encryption on Samsung Galaxy S9 and Galaxy S9 Plus.
- Tap on “Wipe” and choose the Format Data option.
- Enter ‘Yes’ to confirm the process and let it format your device.
- Once done with now you need to flash the zip files you downloaded above.
- While staying it the recovery, you can transfer the file on your device storage, to do so, tap on “Mount” > Enable MTP.
- Now connect your phone to PC via USB cable and copy the DM-Verity disabler ZIP file to the phone’s internal storage.
- Disconnect the device from PC and tap on the “Install” button once again.
- Choose the zip file you have recently transferred.
- Just swipe to confirm the process, upon completion it will disable encryption on Samsung Galaxy S9/S9
Root Galaxy S9 and S9 Plus with Magisk
- Reboot your phone and connect it to PC then move the ElementalX kernel and Magisk ZIP files to the device storage.
- Once done with the copying stuff, boot it into recovery mode again.
- Once in recovery mode, tap on ‘Install’ and choose the ‘ElementalX kernel.zip’ you transferred earlier and confirm on the next screen.
- Now repeat above step for the installation of ‘Magisk-v17.2.zip’ as well.
- Wait for the process to complete and reboot your device when the process is completed.
That’s it! You have successfully installed TWRP recovery and rooted Galaxy S9/S9 Plus. Just start installing the root enabled application on your device. If you are facing any issue in the whole guide just let us know by typing your query in the comment below or personally drop us an email at [email protected].
